
How Can We Help?
Stoneware Objects Implementation
Applications
- Begin name with ‘CHS-‘. (e.g. CHS-Helpdesk-App)
- Add all relay servers where applicable
- Generally the default option is used except where noted below.
Slingshot Apps
- Include ‘Slingshot’ in name. (e.g. CHS-Excel-Slingshot-App)
- Properties
- Application Path: (e.g. @@downloaddir@@\cpub-EXCEL-test-CmsRdsh.rdp) – @@downloaddir@@ specifies the download directory on the local computer.
- Options
- Virtual App Path: (e.g. /SlingshotApps/cpub-EXCEL-test-CmsRdsh.rdp) – This must be on a File Services node that is accessible to the appropriate users.
- Link
- Properties
- Description: Enter display name.
- Assigned To:
- Always add CN=SW-IT SysAdmins, OU=Groups,DC=housingservices,DC=com
- Add other group that need access to this application
- Options Tab
- Link Properties – Check the location this resource should be available.
- URL of Image: Choose a custom image to use as the resource icon
- Open in New Window: Enabled
- Native Window Override: Enabled
- Restrictions
- Relay(s): Add a specific relay to limit access to only that one. Otherwise leave this blank to make it available to all relays.
- Properties
Web Applications
- Virtual Web Application – These allow a resource to be made available externally without firewall pinholes or VPN connection.
- Must create a DNS record both internally and externally that points to the Stoneware relay server. (e.g. sw-timeforce.housingservices.com –> mychs.housingservices.com).
- Properties
- Virtual DNS Name: The virtual DNS name. (e.g. sw-timeforce.housingservices.com)
- Startup URL: The URL beyond the domain name. (e.g. /qqest/Login/Login.asp)
- Options
- Use Pipeline: Enabled
- Internal Server Requires SSL: Enable or Disabled depending on the internal service
- Host Authority: Disabled
- Host
- Host Address: The internal domain name of the service. (e.g. timeforce.housingservices.com)
- Host Port(s): The port of the internal service. (e.g. 443)
- Link
- Properties
- Description: Enter display name.
- Assigned To:
- Always add CN=SW-IT SysAdmins, OU=Groups,DC=housingservices,DC=com
- Add other group that need access to this application
- Options Tab
- Link Properties – Check the location this resource should be available.
- URL of Image: Choose a custom image to use as the resource icon
- Open in New Window: Enabled
- Native Window Override: Enabled
- Restrictions
- Relay(s): Add a specific relay to limit access to only that one. Otherwise leave this blank to make it available to all relays.
- Properties
Remote Desktop Apps
- Remote Desktop Services VPN – These allow a remote desktop connection to pre-designated computers to be made externally without firewall pinholes or VPN connection.
- Options
- Connection Management: Client Selects
- Use Pipeline: Enabled
- Keep Session Alive: Enabled
- Client Type: webRDP HTML5
- Authentication
- Single Sign-on
- Username: @@attr:saMAccountname@@ – Active Directory SAM Account Name
- Password: @@password@@ – Active Directory Password
- Domain: housingservices – CHS Domain
- Single Sign-on
- Host
- Host Address: Enter the DNS name of one computer. (e.g. stoneware.housingservices.com)
- Host Port(s): Generally 3389
- Additional Host Addresses: Enter the DNS names of other computers that should be available via this application. The user will have then be able to select the appropriate computer to connect to.
- Application(s): This host object can be assigned to multiple applications allowing a single user to make more than one concurrent remote desktop connection.
- Link
- Properties
- Description: Enter display name.
- Assigned To:
- Always add CN=SW-IT SysAdmins, OU=Groups,DC=housingservices,DC=com
- Add other group that need access to this application
- Options
- Link Properties – Check the location this resource should be available.
- URL of Image: Choose a custom image to use as the resource icon
- Open in New Window: Enabled
- Native Window Override: Enabled
- Restrictions
- Relay(s): Add a specific relay to limit access to only that one. Otherwise leave this blank to make it available to all relays.
- Properties
SSO
- Properties
- Form Type: webPass
- Server side webPass: Enabled
- Login URL: Generally this will be a virtual web app DNS name. (e.g. https://sw-help.housingservices.com/)
- Trigger URL: Generally this will be a virtual web app DNS name. (e.g. https://sw-help.housingservices.com/)
- Login Page Launch: Enabled
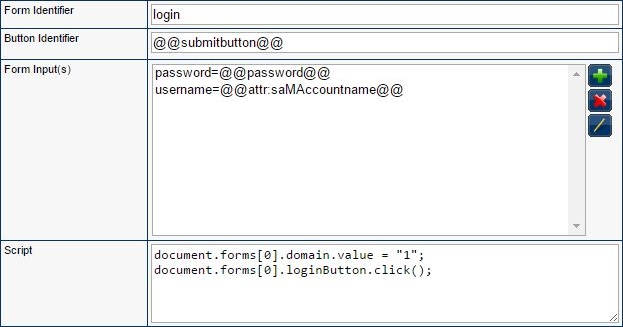
- Form Identifier: See image below
- Button Identifier: See image below
- Form Input(s): See image below
- Script: See image below
- Assigned To:
- Always add CN=SW-IT SysAdmins, OU=Groups,DC=housingservices,DC=com
- Add other group that need access to this application.
File Services
- Properties
- Folder-Name: Enter a display name for the item
- Data Provider Type: CIFS
- Host: The server that houses the share. Generally the host name is all that is necessary.
- Path: The path to the share. (e.g. Dropbin\Central)
- Rights
- Assigned Users:
- Always add CN=SW-IT SysAdmins, OU=Groups,DC=housingservices,DC=com
- Add other group that need access to this application.
- Rights: Check the appropriate rights. NTFS rights are most important. This only acts as a “filter” for NTFS rights.
- Assigned Users:
- Authentication
- Authentication: Specified Credentials
- Username: @@attr:saMAccountname@@
- Password: @@password@@
- Application Integration
- Live Edit: Enabled
- Live Edit Application: CN=LiveEditProd-App,OU=Stoneware,DC=housingservices,DC=com
- Local Edit: Disable
- File Action: *:301452
Links/Menus
- See the appropriate Application section above for application specific information regarding application links.
Link Only
- No associated application, such as a simple web site link
- Properties
- Type: Standard Link
- Description: Enter a display name
- Standard URL: Enter the full URL of the resource. (e.g. https://housingservices.com)
- Assigned To:
- Always add CN=SW-IT SysAdmins, OU=Groups,DC=housingservices,DC=com
- Add other group that need access to this application.
- Options
- Link Properties – Check the location this resource should be available.
- URL of Image: Choose a custom image to use as the resource icon
- Open in New Window: Enabled
- Native Window Override: Enabled
- Restrictions
- Relay(s): Add a specific relay to limit access to only that one. Otherwise leave this blank to make it available to all relays.